Importing and Exporting Audio : Exporting audio

Exporting audio
You can export audio from Reason in some different ways. Besides exporting songs or parts of songs, it’s also possible to export (bounce) audio from separate Mixer Channels, with or without the mixer settings. It’s also possible to export (bounce) individual Audio Clips. You can choose a variety of sample rates for the exported/bounced audio, and also various audio file formats and resolutions.
Exporting Songs or parts of Songs
There are two ways of exporting the mix of all active sequencer tracks in a song:
*
Proceed as follows to export the mix of an entire song, or a loop section of a song:
1.
*
2.
The “Export Song as Audio File” or “Export Loop as Audio File” dialog appears.
3.
Choose a file name and select file format.
4.
If you are exporting at 16-bit Bit Depth you will have the option of applying Dither. Dither means that a type of noise is added to the digital signal to improve low level sound quality when exporting high resolution audio at a lower bit depth. Reason features a new, and very sophisticated, dithering algorithm with noise shaping.
*
Select Sample Rate, Bit Depth and Dithering of the audio to be exported.
About Tempo data in exported audio files
In addition to the audio data, tempo data is automatically included in the exported audio file. The tempo data contains information about the song Tempo and any Tempo Automation used in the song/loop. If you import such an audio file into another Reason song, it will automatically stretch to fit the current song tempo.
If the section to be exported contains audio for which high-quality stretching hasn't already been done, this will be calculated before the actual export happens. When Reason performs high-quality stretching, the CALC indicator on the Transport Panel shows a progress bar:
The CALC indicator indicates when Reason performs high-quality stretching of audio.
As soon as the high-quality stretching is finished, the dialog will be closed.
Bouncing Mixer Channels
Bouncing Mixer Channels basically means “recording” the audio outputs from Audio Track Channels and/or Mix Channels and then automatically creating separate audio files. The audio files can then be saved to disk or placed on new Audio Tracks in your song. If you choose to bounce to disk, the audio files will be automatically saved to disk as separate audio files. If you instead choose to bounce to new tracks, the bounced audio files will be automatically placed on new Audio Tracks in the sequencer.
The “bounce to disk” option is ideal if you want to export your sequencer tracks separately for further processing in external applications. The “bounce to track” option is great if you, for example, have instrument tracks with lots of resource consuming Insert FX etc. and therefore want to render them into audio to free up DSP resources in your song.
You can choose to bounce the Mixer Channels, either throughout the entire song, or only between the Left and Right Locators. You can also choose to bounce with or without mixer settings.
*
To bounce Mixer Channels proceed as follows:
1.
The “Bounce Mixer Channels” dialog appears:
The “Bounce Mixer Channels” dialog.
When you open the “Bounce Mixer Channels” dialog, some channels in the Mixer Channels list might already be checked. This depends on what Mixer Channels (or their corresponding tracks or rack devices) were selected when you opened the dialog. The Master Section and FX Returns are never automatically checked when you open the dialog; you have to do that manually.
2.
The Mixer Channels in the list appear in the order they are placed in the Main Mixer, i.e. not necessarily in numerical or chronological order. The color tags in the list correspond to the Channel Strip colors in the Main Mixer. The Master Section is always listed as “Master Section” in the list and the eight FX Returns are listed as "FX 1 Return (<name>)", where <name> is the FX name shown on the label in the Main Mixer. Selecting FX Returns makes it possible to bounce reverbs and other Send FX you might be using in your song. The FX signal is tapped after FX Return Level/Pan/Mute if “Apply Mixer Settings = All” (see below). Otherwise, the signals will be taken at the FX Return inputs.
*
3.
*
Since the Pan parameter is included, mono Mixer Channels will be bounced as stereo audio files.
*
Stereo Mixer Channels will be bounced as stereo audio files whereas mono Mixer Channels will be bounced as mono audio files. For the Master Section, this option means including Insert FX and the Master Compressor, but not the master fader.
*
Bounced files will be in stereo if there's any stereo material on the Audio Track (or, for a Mix Channel, if it's connected in stereo). Otherwise, the bounced audio files will be in mono.
4.
Normalizing is useful to get good levels when you proceed to use the bounced audio files in another application, or to avoid clipping.
5.
*
*
*
6.
*
When “New Tracks in Song” is selected, the File Format settings in the dialog are disabled (as is the "Export Tempo Track (.MID)" setting). The audio will be rendered at the current song’s sample rate (i.e. what you have previously set up in the hardware audio interface), at full 32-bit float resolution.
Clicking OK will create a new Audio Track for each selected Mixer Channel, create an Audio Clip on each of these Tracks and render the Mixer Channel audio as a recording on a Comp Row in the Audio Clip.
The new Audio Tracks will get the names and colors of their corresponding (bounced) Mixer Channels. The Audio Clips will get the same color but will not be labeled (named).
The new recordings (on the Comp Rows) will get the name of their source Mixer Channels + "(Bounced)", e.g.
"Picked Guitar (Bounced)" if the bounced Mixer Channel’s name is “Picked Guitar”.
Selecting "Mute Original Channels" will mute all bounced Mixer Channels (those selected in the Mixer Channels list) after the bouncing. If there are automation lanes for their Mute buttons, their ON buttons will be turned off.
If you selected “None” in the “Apply mixer settings” section, you will be given the option to copy the original mixer channel settings to the destination channels. To do this, tick the “Copy original channel settings” box.
*
*
When “Audio Files on Disk” is selected, the "Mute Original Channels" option in the dialog is automatically disabled.
Choose File Type, Sample Rate, Bit Depth and any Dither in the “File Format” section.
Clicking OK will bring up a Save dialog which allows you to select a folder, or create a new folder. Clicking Save will then create one audio file per selected Mixer Channel and place in a sub-folder named “Bounced <song name>”. All audio files will have the file type, sample rate and bit depth as defined in the “File Format” section.
The audio files will get the name of the bounced Mixer Channels, plus the File Type extension. If several selected Mixer Channels have the same name, an incremental number (starting with "-01") will be automatically added before the file extension.
The Song Tempo, and any Tempo Automation, is also included in the exported audio files. This means that if you import the audio files into another Reason Song document, they will automatically be stretched to the Song Tempo of that song.
If "Export Tempo Track (.MID)" is activated, the bounce function will also export a separate MIDI file containing the Song Tempo, and any Tempo Automation data. The MIDI file will have the name of the song, with the extension ".MID". This MIDI file can then be imported to the tempo automation lane in another Reason Song document, or to the tempo track in another DAW, to automatically set the song tempo and control any tempo automation in the sequencer.
*
Bouncing Audio Clips
The “Bounce Clip to Disk” function
The “Bounce Clip to Disk” function becomes available when a single Audio Clip is selected (in Arrange Mode or Edit Mode). The function allows you to bounce single Audio Clips, after the Clip Level and Fades but without the Mixer Channel settings, to disk for further processing in an external application, for example. Do like this to bounce an audio clip to disk:
1.
The “Bounce Clip As Audio File” dialog appears. It looks the same, and has the same functionality, as the “Export Song as Audio File” and “Export Loop as Audio File” dialogs.
2.
(The default name in the dialog is the Clip name + extension, or (if there's no name label on the clip) the track name + extension.)
Choose a file name and select file format.
3.
If you are exporting at 16-bit Bit Depth you will have the option of applying Dither. Dither means that a type of noise is added to the digital signal to improve low level sound quality when exporting high resolution audio at a lower bit depth. Reason features a new, and very sophisticated, dithering algorithm with noise shaping.
*
Select Sample Rate, Bit Depth and Dithering of the audio clip to be bounced.
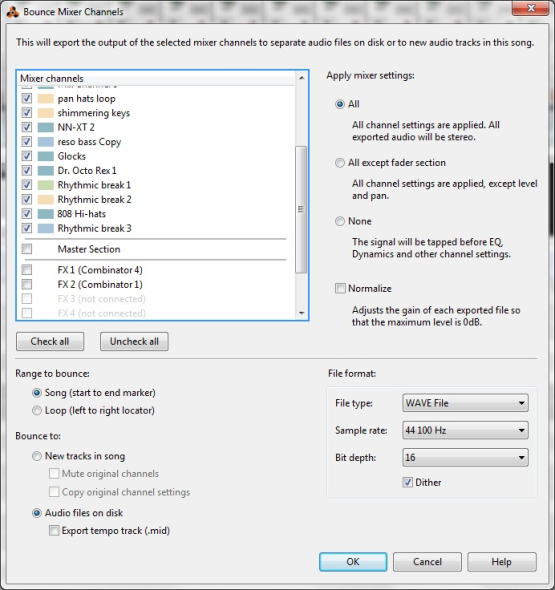
The exported audio file will also contain tempo data as described in “About Tempo data in exported audio files”.
About the “Bounce Clip to New Sample” function
You can bounce an Audio Clip to a new Song Sample if you like. You could then edit the sample and load into a sampler device for playback.
See “Bounce Clip(s) to New Sample(s)” in the “Audio Editing in the Sequencer” chapter for more details.
About the “Bounce Clip to New Recording” function
You can also bounce an Audio Clip to a new recording on an additional Comp Row in the Audio Clip. This is like a non-destructive “Flatten” operation. It will create a new recording from the clip output - ignoring Clip Level and Clip Fade In/Out settings. The recording will be placed on a new Comp Row at the top of the Comp Row list in the clip. The Audio Clip will then automatically switch to Single Mode.
See “Bounce Clip(s) to New Recording(s)” in the “Audio Editing in the Sequencer” chapter for more details.
About the “Bounce Clip to REX Loop” function
A Single Take clip, which is open for inline editing, features the function “Bounce Clip to REX Loop” on the Edit and context menu. This allows you to generate a REX loop out of the Single Take audio clip. The REX loop can then be used in a Dr Octo Rex device in Reason and/or be exported to disk.
See “Bounce Clip to REX Loop” in the “Audio Editing in the Sequencer” chapter for more details.

Importing and Exporting Audio : Exporting audio